Haute disponibilité
Tutoriel: Déploiement de l'infrastructure avec Galera, HAProxy et Nginx
Ce guide décrit une architecture haute disponibilité pour WordPress avec:
- Un cluster MariaDB Galera (3 noeuds)
- Deux serveurs HAProxy avec bascule Keepalived (VRRP)
- Deux serveurs web Nginx + PHP-FPM
1. Vue d'ensemble
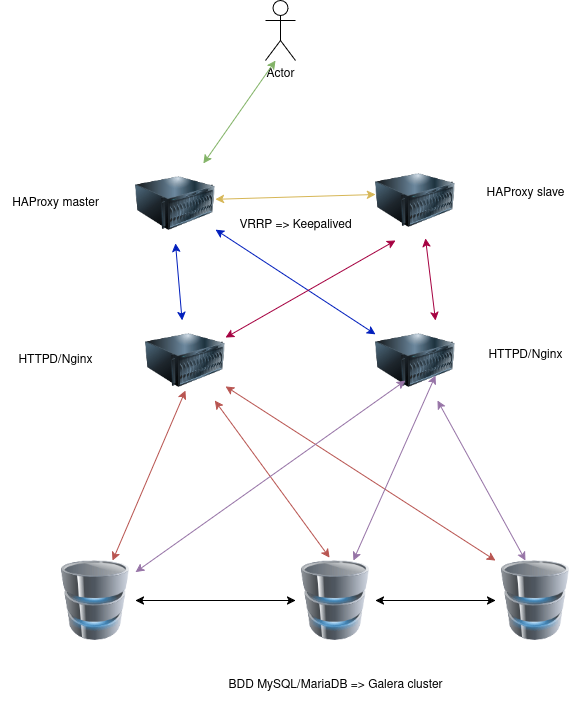
1.1 Topologie cible
mariadb1.ha.lan-192.168.50.100mariadb2.ha.lan-192.168.50.101mariadb3.ha.lan-192.168.50.102web1.ha.lan-192.168.50.110web2.ha.lan-192.168.50.111haproxy1.ha.lan-192.168.50.120haproxy2.ha.lan-192.168.50.121
VIP:
192.168.50.210(HTTP)192.168.50.220(MySQL)
2. Configuration machine vierge (Rocky Linux minimal)
2.1 Installation de base
- Installer Rocky Linux minimal
- Allouer 30 Go de disque
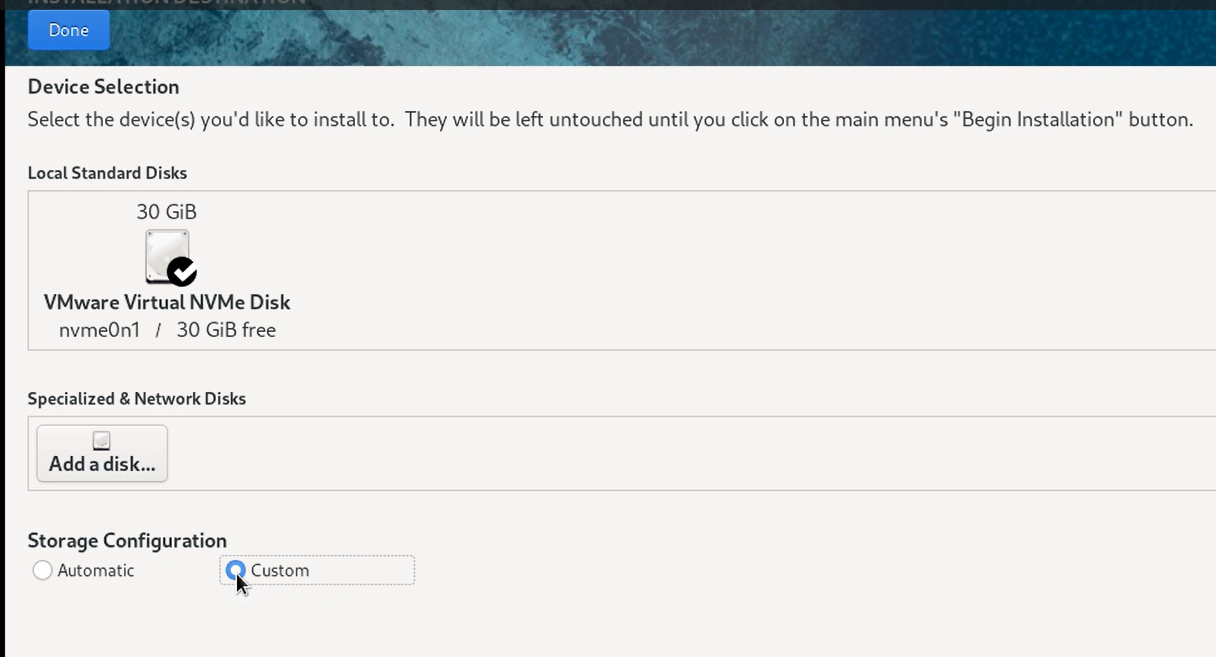
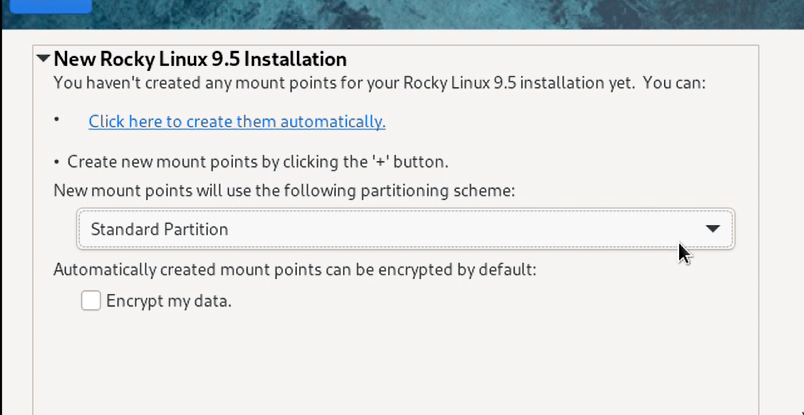
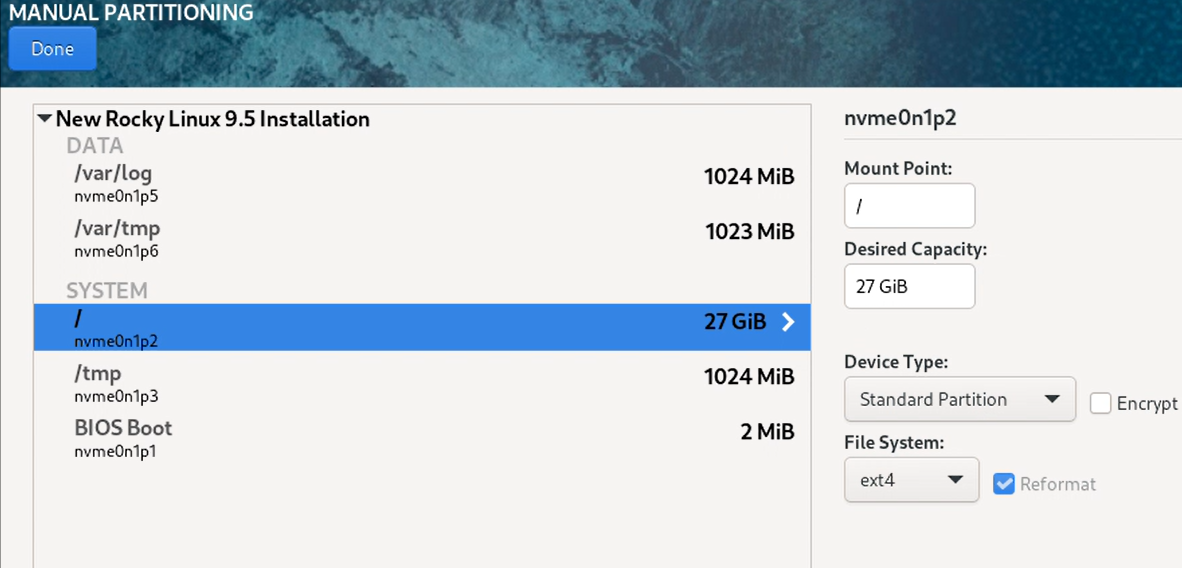
2.2 Partitionnement manuel (exemple 30 Go)
| Point de montage | Taille | Systeme de fichiers | Type |
|---|---|---|---|
/tmp | 1024 MiB | ext4 | Standard Partition |
/var/tmp | 1023 MiB | xfs | Standard Partition |
/var/log | 1024 MiB | ext4 | Standard Partition |
BIOS Boot | 2 MiB | xfs | BIOS Boot Partition |
/ | 27 GiB | ext4 | Standard Partition |
La partition BIOS Boot est necessaire uniquement en mode Legacy (non-UEFI).
En mode UEFI:
- Supprimer
BIOS Boot - Creer
/boot/efi(300 MiB, FAT32, typeEFI System Partition)
Selon le tuto source: ne pas activer/definir un compte root direct pendant l'installation et privilegier un utilisateur avec sudo.
3. Preparation des machines
3.1 Outils de base
Commandes (a executer sur toutes les VM):
sudo dnf install bash-completion vim policycoreutils-python-utils setools-console -y
3.2 Configuration reseau
Commandes:
sudo nmtui
sudo systemctl restart NetworkManager
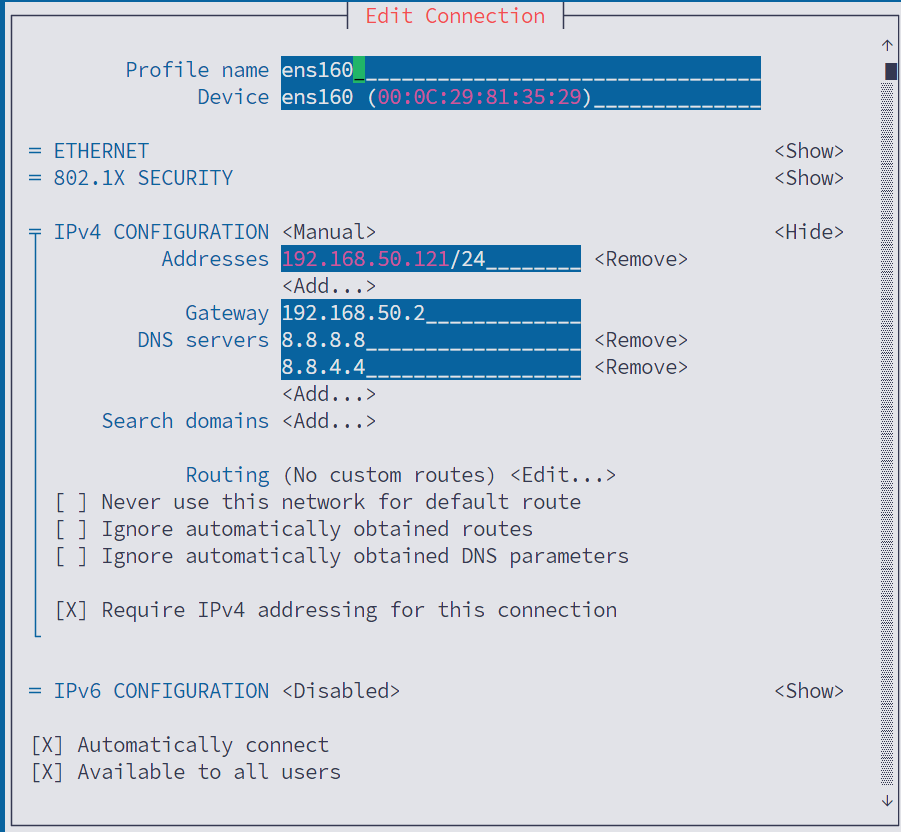
3.3 Configuration des noms d'hotes
Editer:
/etc/hostname/etc/hosts
Commandes:
sudo vim /etc/hostname
sudo vim /etc/hosts
Ajouter dans /etc/hosts:
192.168.50.100 mariadb1.ha.lan
192.168.50.101 mariadb2.ha.lan
192.168.50.102 mariadb3.ha.lan
192.168.50.110 web1.ha.lan
192.168.50.111 web2.ha.lan
192.168.50.120 haproxy1.ha.lan
192.168.50.121 haproxy2.ha.lan
4. Installation et configuration de Galera
4.1 Pare-feu (noeuds MariaDB)
Commandes:
sudo firewall-cmd --add-service=galera --permanent
sudo firewall-cmd --reload
sudo firewall-cmd --list-all
4.2 Installation MariaDB + Galera
Commande:
sudo dnf install mariadb-server mariadb-server-galera galera rsync -y
4.3 Configuration Galera (/etc/my.cnf.d/galera.cnf)
Exemple pour mariadb1:
[galera]
wsrep_on = ON
wsrep_provider = /usr/lib64/galera/libgalera_smm.so
wsrep_cluster_name = "MariaDB Galera Cluster"
wsrep_provider_options = "pc.ignore_quorum=1"
wsrep_cluster_address = gcomm://192.168.50.100,192.168.50.101,192.168.50.102
binlog_format = row
default_storage_engine = InnoDB
innodb_autoinc_lock_mode = 2
innodb_buffer_pool_size = 128M
wsrep_node_name = DB1
wsrep_node_address = 192.168.50.100
wsrep_sst_method = rsync
bind-address = 0.0.0.0
Pour mariadb2 et mariadb3, adapter:
wsrep_node_namewsrep_node_address
Verifier que la configuration est identique sur les 3 noeuds, sauf le nom/adresse de noeud.
4.4 Demarrage du cluster
Sur mariadb1 uniquement (bootstrap initial):
sudo galera_new_cluster
sudo systemctl enable --now mariadb
Sur mariadb2 et mariadb3:
sudo systemctl enable --now mariadb
4.5 Securisation MariaDB
sudo mysql_secure_installation
4.6 Creation des bases WordPress
Se connecter:
mysql -u root -p
Puis executer:
CREATE USER 'wordpress'@'%' IDENTIFIED BY 'password';
CREATE DATABASE wordpress CHARACTER SET utf8mb4 COLLATE utf8mb4_unicode_ci;
GRANT ALL PRIVILEGES ON wordpress.* TO 'wordpress'@'%';
FLUSH PRIVILEGES;

CREATE USER 'wordpress2'@'%' IDENTIFIED BY 'password';
CREATE DATABASE wordpress2 CHARACTER SET utf8mb4 COLLATE utf8mb4_unicode_ci;
GRANT ALL PRIVILEGES ON wordpress2.* TO 'wordpress2'@'%';
FLUSH PRIVILEGES;
Remplacer les mots de passe d'exemple (password) par des mots de passe robustes.
5. Installation et configuration de HAProxy + Keepalived
5.1 Installation
sudo dnf install haproxy keepalived -y
5.2 Pare-feu
sudo firewall-cmd --add-service=http --permanent
sudo firewall-cmd --add-port=3306/tcp --permanent
sudo firewall-cmd --reload
5.3 Keepalived - serveur master (haproxy1)
Fichier: /etc/keepalived/keepalived.conf
! Configuration File for keepalived
global_defs {
	notification_email {
		acassen@firewall.loc
		failover@firewall.loc
		sysadmin@firewall.loc
	}
}

# Instance VRRP HTTP (VIP: 192.168.50.210)
vrrp_instance VI_HTTP {
	state MASTER
	interface ens160
	virtual_router_id 51
	priority 101
	advert_int 1
	authentication {
		auth_type PASS
		auth_pass 1111
	}
	virtual_ipaddress {
		192.168.50.210/32 brd 192.168.50.255 scope global
	}
}

# Instance VRRP DB (VIP: 192.168.50.220)
vrrp_instance VI_DB {
	state MASTER
	interface ens160
	virtual_router_id 52
	priority 101
	advert_int 1
	authentication {
		auth_type PASS
		auth_pass secret
	}
	virtual_ipaddress {
		192.168.50.220/32 brd 192.168.50.255 scope global
	}
}
5.4 Keepalived - serveur slave (haproxy2)
Copier la meme configuration en adaptant:
state BACKUPpriority 100
5.5 Activation Keepalived
sudo systemctl enable --now keepalived
5.6 Configuration HAProxy (/etc/haproxy/haproxy.cfg)
#---------------------------------------------------------------------
# VIP WORDPRESS
#---------------------------------------------------------------------
frontend main
	bind 192.168.50.210:80
	option http-server-close
	default_backend app-main

backend app-main
	balance leastconn
	server web1 192.168.50.111:80 check
	server web2 192.168.50.110:80 check

#---------------------------------------------------------------------
# VIP DB
#---------------------------------------------------------------------
frontend mysql_front
	bind 192.168.50.220:3306
	mode tcp
	option tcplog
	default_backend mariadb

backend mariadb
	mode tcp
	option tcpka
	option redispatch
	balance leastconn
	retries 2
	timeout connect 3s
	timeout server 10s
	timeout client 10s
	server mariadb1 192.168.50.100:3306 weight 2 check inter 1s rise 2 fall 1 on-marked-down shutdown-sessions
	server mariadb2 192.168.50.101:3306 weight 3 check inter 1s rise 2 fall 1 on-marked-down shutdown-sessions
	server mariadb3 192.168.50.102:3306 weight 1 check inter 1s rise 2 fall 1 on-marked-down shutdown-sessions
Si HAProxy ne redemarre pas a cause de SELinux:
sudo semanage port -a -t http_port_t -p tcp 3306
sudo semanage port -l | grep 3306
sudo systemctl restart haproxy
6. Installation et configuration de Nginx + PHP-FPM
6.1 Pare-feu (serveurs web)
sudo firewall-cmd --add-service=http --permanent
sudo firewall-cmd --add-service=https --permanent
sudo firewall-cmd --reload
6.2 Installation des paquets
sudo dnf install -y nginx php php-fpm php-mysqlnd php-curl php-xml php-mbstring php-gd php-zip php-intl
sudo systemctl enable --now nginx
sudo systemctl enable --now php-fpm
6.3 Configuration PHP-FPM
Fichier: /etc/php-fpm.d/www.conf
user = nginx
group = nginx
listen = 127.0.0.1:9000
6.4 Installation WordPress
cd /tmp
sudo wget https://wordpress.org/latest.tar.gz
sudo tar -xzvf latest.tar.gz
sudo mv wordpress /var/www/
sudo chown -R nginx:nginx /var/www/wordpress
sudo chmod -R 755 /var/www/wordpress
6.5 Configuration Nginx WordPress
Fichier: /etc/nginx/conf.d/wordpress.conf
server {
	listen 80;
	server_name 192.168.50.110;
	root /var/www/wordpress;
	index index.php index.html;

	location / {
		try_files $uri $uri/ /index.php?$args;
	}

	location ~ \.php$ {
		include /etc/nginx/fastcgi_params;
		fastcgi_pass 127.0.0.1:9000;
		fastcgi_index index.php;
		fastcgi_param SCRIPT_FILENAME $document_root$fastcgi_script_name;
	}

	location ~ /\.ht {
		deny all;
	}
}
Adapter server_name selon la machine (web1 ou web2) ou utiliser un nom DNS commun.
6.6 Finalisation
sudo setsebool -P httpd_can_network_connect on
sudo setsebool -P httpd_read_user_content on
sudo nginx -t
sudo systemctl restart nginx php-fpm
7. Tests de haute disponibilite
Effectuer un test de bascule en mettant hors service, un par un:
db1db3web1haproxy1
Verifier a chaque etape:
- Accessibilite du site via VIP HTTP (
192.168.50.210) - Continuité d'acces MySQL via VIP DB (
192.168.50.220) - Migration des VIP vers le noeud HAProxy secondaire
8. Checklist rapide
- Les 3 noeuds Galera sont synchronises
- Keepalived fonctionne (VIP presentes)
- HAProxy distribue vers les 2 serveurs web
- WordPress est accessible via la VIP HTTP
- Les permissions WordPress sont correctes
- Les tests de bascule sont valides
9. Ressources
- Rocky Linux: https://rockylinux.org/fr-FR/download
- HAProxy documentation: https://www.haproxy.com/documentation/
- WordPress: https://wordpress.org/latest.tar.gz